
NOTE: I put the buckle on the wrong side - MAKE SURE you put the buckle cheekpiece on the LEFT side of the model's head!!!
I had an itch to make something last night, and I remembered the leftover chamois I had…by the way, I live off of leftovers! So, Zenyatta’s shadow roll (shadow roll is racetrack speak for fleece covered noseband) was born…here are some instructions on how to make your own.
I had an itch to make something last night, and I remembered the leftover chamois I had…by the way, I live off of leftovers! So, Zenyatta’s shadow roll (shadow roll is racetrack speak for fleece covered noseband) was born…here are some instructions on how to make your own.

leather lace (I used 3/32” for the noseband part, and 1/16” for the crownpiece),
a fleece imitation material (e.g. chamois),
two buckles (again, one 3/32” for the noseband part and 1/16” for the crownpiece),
glue (I use Duco cement – it bonds extremely fast. Just be careful, though – once you get it on your model, it won’t come off!).
An X-Acto knife is great for cutting the lace and for skiving. You also should have the model you are making the noseband for on hand so it fits correctly. I also have my racing bridle on hand to put the noseband onto it when I finish.
Oh, and don’t forget the complementary snack of trail mix…rasins separated from the cashews.
Start out by taking your 3/32” lace (or noseband lace) and skiving a thin slice of leather off of the last half inch. Make a fold in the middle of the skived section 2 and crimp it with the flat portion of a pair of pliers.
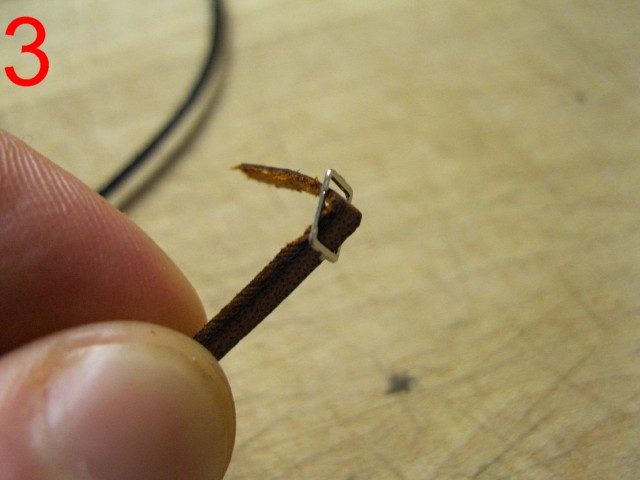
Now, take your 3/32” buckle and thread it onto the crimped lace as shown in the photo 3. Glue that tab down and let the glue dry.
Once the glue is dried, take the lace (with the buckle on one end) and wrap it around your model’s nose as shown in the photo 4.

With the lace held about where the noseband should sit, fold a slight crimp into the lace about ½” past the buckle; see photo again, note where my finger is on the lace, crimp the piece on the left. Take lace off of your model and cut at the crimp. Trim the end into a triangular taper, and if you’d like, you can skive a half inch off the tapered end for ease of fastening.

Once finished with that, buckle the strap (feed the tapered end into your buckle) and slide it onto your model’s nose 6
Make sure it sits exactly where you’d like the finished noseband to sit. Center the buckle between the model’s jawbones 5

Now, take another look at the 5th photo above. Take your X-Acto knife and make a mark on the noseband just a smidge below the jawbone. Make a slit big enough to accommodate the 1/16” lace through the 3/32” lace. 7

This photo shows the slit. Fold the still-fastened noseband in half and duplicate the slit on the other side of the noseband.
Take the 1/16” lace and skive a section off the end. I used a pair of tweezers to poke the lace through. 8 fold the lace over and glue it to itself. This is the beginning of the buckle strap.


Repeat the above process (minus the buckle), and pull the lace over the model’s head, like so: 10

Note where Zenny’s jawbone is on the excess lace; trim there and cut a taper onto the end. You can fasten the crownpiece if you like to check fit. 11 12


Now, unbuckle the noseband and lay it out on your workspace. 13 Check a reference picture for the correct size and placement of your shadow roll on the noseband. 14


Lay out your chamois so that one corner lines up with the inside of one of the crown pieces. 15 16 Trim the chamois just inside the opposite cheek piece and slice as evenly as you can into the chamois about ½”.


Flip the noseband over so that the flesh (rough) side is up, and smear some glue on the flesh side of the noseband inside the cheekpieces 17 . Press the chamois against the glue as shown above. LET THIS DRY COMPLETELY BEFORE MOVING ON, OR THE GLUE BOND MAY NOT HOLD.

Once glue is dry, roll the noseband so the chamois wraps around the leather lace. 18 Once you know how much chamois it will take to completely cover the noseband once, just overlapping the edge of the previously glued section, and trim it as evenly as possible.

19 I unwrapped the chamois to give you an idea of how much chamois you’ll need. If you unwrapped to check, wrap it back up and run a strip of glue along the edge and press the chamois down. AGAIN, LET THE GLUE DRY BEFORE MOVING ON, OR YOU WILL WEAKEN THE GLUE BOND. You can bend the noseband a little as if it were on the model’s nose – just don’t put it on the model or you will leave wet glue that will not come off!

20 I overlapped a little more than I needed, but if you did that too, no big deal. Too much is better than not enough – remember that. Just trim it off like I did above.

21 The finished product! Enjoy the next few photos of Zenyatta’s new shadow roll! P.S. THIS SET MAY BE FOR SALE IN THE FUTURE! KEEP CHECKING UP ON MY BLOG FOR MORE INFO!!


Please ignore the annoying yellow...having some problems with the highlighter...
No comments:
Post a Comment